Using the LUT Editor
Dragonfly's look-up table (LUT) functions, which determine how regions within specific arrays of intensity are displayed and colored, can now be applied and edited directly in the Window Leveling panel to optimize the 2D and 3D views of datasets. Depending on which LUT you choose, the difference between the original and remapped version can be subtle or very dramatic.
The integrated LUT Editor, shown below, displays a plot of the current image’s look-up table (LUT) that describes the shade or color that is displayed for each of the possible pixel values, as well as its opacity. When set to “Piecewise”, control points are inserted into the histogram that highlight regions within specific arrays of intensity. By manipulating the color and alpha control points, the best overall contrast between various features can be achieved. You can edit any of the available LUTs, as well as create your own.
LUT Editor properties and settings

|
|
Description |
|---|---|
|
Alpha control points |
Available whenever Opacity mapping is set to 'Piecewise', determines the opacity — from transparent to fully opaque — of a region. The normalized position of the control point within the selected window, its physical position (the value to which it corresponds), as well as the control point’s alpha value, are indicated in the Selected control point box. |
|
Legend |
Displays the shades or colors of the selected LUT. |
|
Color control points |
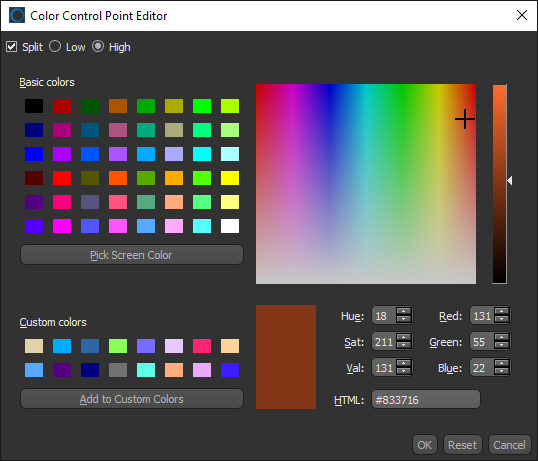
Determines the shade or color applied to a region. The normalized position of the control point within the selected window, its physical position (the value to which it corresponds), as well as the control point’s color or colors, are indicated in the Selected control point box. Double-click a Color control point or click the color swatch to open the Color Control Point Editor dialog, shown below. You can choose a color for a control point in the dialog, as well as choose to split a control point and then pick colors for the lower and higher values.
|
|
Lookup table (LUT) |
The controls in the Lookup table (LUT) box let you choose a LUT to apply to the selected data, as well as access options for distributing color points, flipping the position of the control points, converting the alpha values to piecewise, importing LUT settings, as well as resetting and saving LUTs. The More button provides access to the following options: Distribute Color Control Points Equally… Automatically distributes the color control points equally — either between the data range, if ‘Map to full range’ is selected as the LUT mapping mode, or within the window, if ‘Map to Window’ is selected as the LUT mapping mode. Flip Color Control Points Position (Horizontal Flip)… Automatically flips the position of the color control points horizontally. Edit Discrete LUT… Opens the Discrete LUT Editor dialog, in which you modify the colors of a discrete LUT (see Editing Discrete LUTs). Distribute Alpha Control Points Equally… Automatically distributes the alpha control points equally — either between the data range, if ‘Map to full range’ is selected as the LUT mapping mode, or within the window, if ‘Map to Window’ is selected as the LUT mapping mode. Flip Alpha Control Points Position (Horizontal Flip)… Automatically flips the position of the alpha control points horizontally. Flip Alpha Control Points Value (Vertical Flip)… Automatically flips the value of the alpha control points. For example, an initial value of 0.70 will become 0.30 when it is flipped. Sample Alpha as Piecewise… Automatically adds alpha control points to the current window leveling mode as per the current alpha distribution. This option will not be available if the current window leveling mode is ‘Piecewise’. Import LUT Settings… Lets you import and apply the settings of another LUT to the current LUT. Revert to Saved LUT… Resets the LUT back to its last-saved settings. Save LUT As… Lets you save a new version of the selected LUT for the current user or for all users (see Saving LUTs). Delete… LUT Lets you delete a custom LUT. You should note that you cannot delete any of the default LUTs. |
You can edit any of the available LUTs to improve the visualization of 2D and 3D images, multi-ROIs, scalar meshes, vector fields, and graphs.
- Choose the LUT you want to edit in Lookup table (LUT) drop-down menu on the Window Leveling panel or in Color/LUT box on the Data Properties and Settings panel.
Note In general, you should edit the LUT that produces the best initial results.
- Do one of the following:
- Choose Piecewise as the Opacity Mapping mode.
- Click the More button in the Lookup table (LUT) box on the Window Leveling panel and then choose Sample Alpha as Piecewise in the drop-down menu if you had selected any other Opacity Mapping mode.
- Add or remove Alpha control points, as required.
- To add an Alpha control point, hold down Left Ctrl and then click inside the histogram window.
- To remove an Alpha control point, hold down Left Shift and then click the Alpha control point.
- Modify the position and/or opacity associated with the Alpha control points, as required.
- Drag the control point or enter the required values in the Alpha edit box to modify its position and or associated opacity.
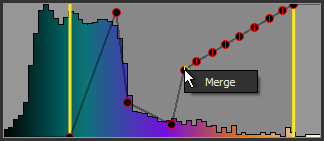
- If required, you can merge split control points by right-clicking and then choosing Merge in the pop-up menu, as shown below.
- If required, you can split merged control points by right-clicking and then choosing Split in the pop-up menu.
- Add or remove Color control points, as required.
- To add a Color control point, hold down Left Ctrl and then click at the position that you want it to appear.
- To remove an Color control point, hold down Left Shift and then click the control point.
- Modify the position and/or color associated with the Color control points, as required.
- Drag the control point or enter the required values in the Color edit box to modify its position.
- Double-click a control point to open the Color Control Point Editor dialog. You can then modify the current color(s).
Note You can also click the color swatch in the Color edit box to open the Color Control Point Editor dialog.
- If required, you can also modify the control points with the options available in the More drop-down menu.
- Save the edited LUT, if required (see Saving LUTs).
You can edit any of the available discrete LUTs to improve the visualization of 2D and 3D images, multi-ROIs, scalar meshes, vector fields, and graphs.
- Choose the Discrete LUT you want to edit in Lookup table (LUT) drop-down menu on the Window Leveling panel or in Color/LUT box on the Data Properties and Settings panel.
Note In general, you should edit the Discrete LUT that produces the best initial results.
- Click the More button in the Lookup table (LUT) box on the Window Leveling panel and then choose Edit Discrete LUT in the drop-down menu.
The Discrete LUT Editor appears.

- Do the following, as required:
- To change a color, click the required color swatch and then choose a new color in the Color dialog (see Choosing Colors).
- To add a new color, click the "+" box and then choose a new color in the Color dialog (see Choosing Colors).
- Click Reset to reset the edited Discrete LUT to its last applied setting.
- Click OK to apply your changes and close the dialog.
- Save the edited LUT, if required (see Saving LUTs).
You can save the settings of an edited LUT for the current user or all users, as well as add a description of the LUT and other information. These options are available in the Save LUT As dialog, shown below.
Save LUT As dialog

- Click the More button in the Lookup table (LUT) box and then choose Save LUT As in the drop-down menu.
- Choose a LUT name, as well as an accessibility option — Current user or All users — in the Save LUT As dialog.
Note LUTs saved for the current user are saved in
…\AppData\Local\ORS\Dragonflyxxx.x\pythonUserExtensions\LUTs, while those saved for all users are saved in…\ProgramData\ORS\Dragonflyxxxx.x\pythonAllUsersExtensions\LUTs. - Enter a description of the new LUT, as well as author, contact, and copyright information, optional.
- Click OK to save the LUT.


